Heater housing "stuck vent knob" access

quillaja

2004 2500 140WB high roof
So I finally got around to experimenting further with removing the heater housing cover, which I first asked about in this thread: https://sprinter-source.com/forum/showthread.php?t=52078

TLDR, I didn't remove it because I was able to solve my problem without removal, but I suspect it could be removed. I might have found a reason for the "stuck/hard to turn air vent control" issue that folks have. Hopefully someone finds this helpful.

Essentially, it involves cutting 3 access holes into a seemingly pointless cross piece in the dash. I had only a 4in cutting blade on my grinder, but something smaller would allow you to make prettier cuts.


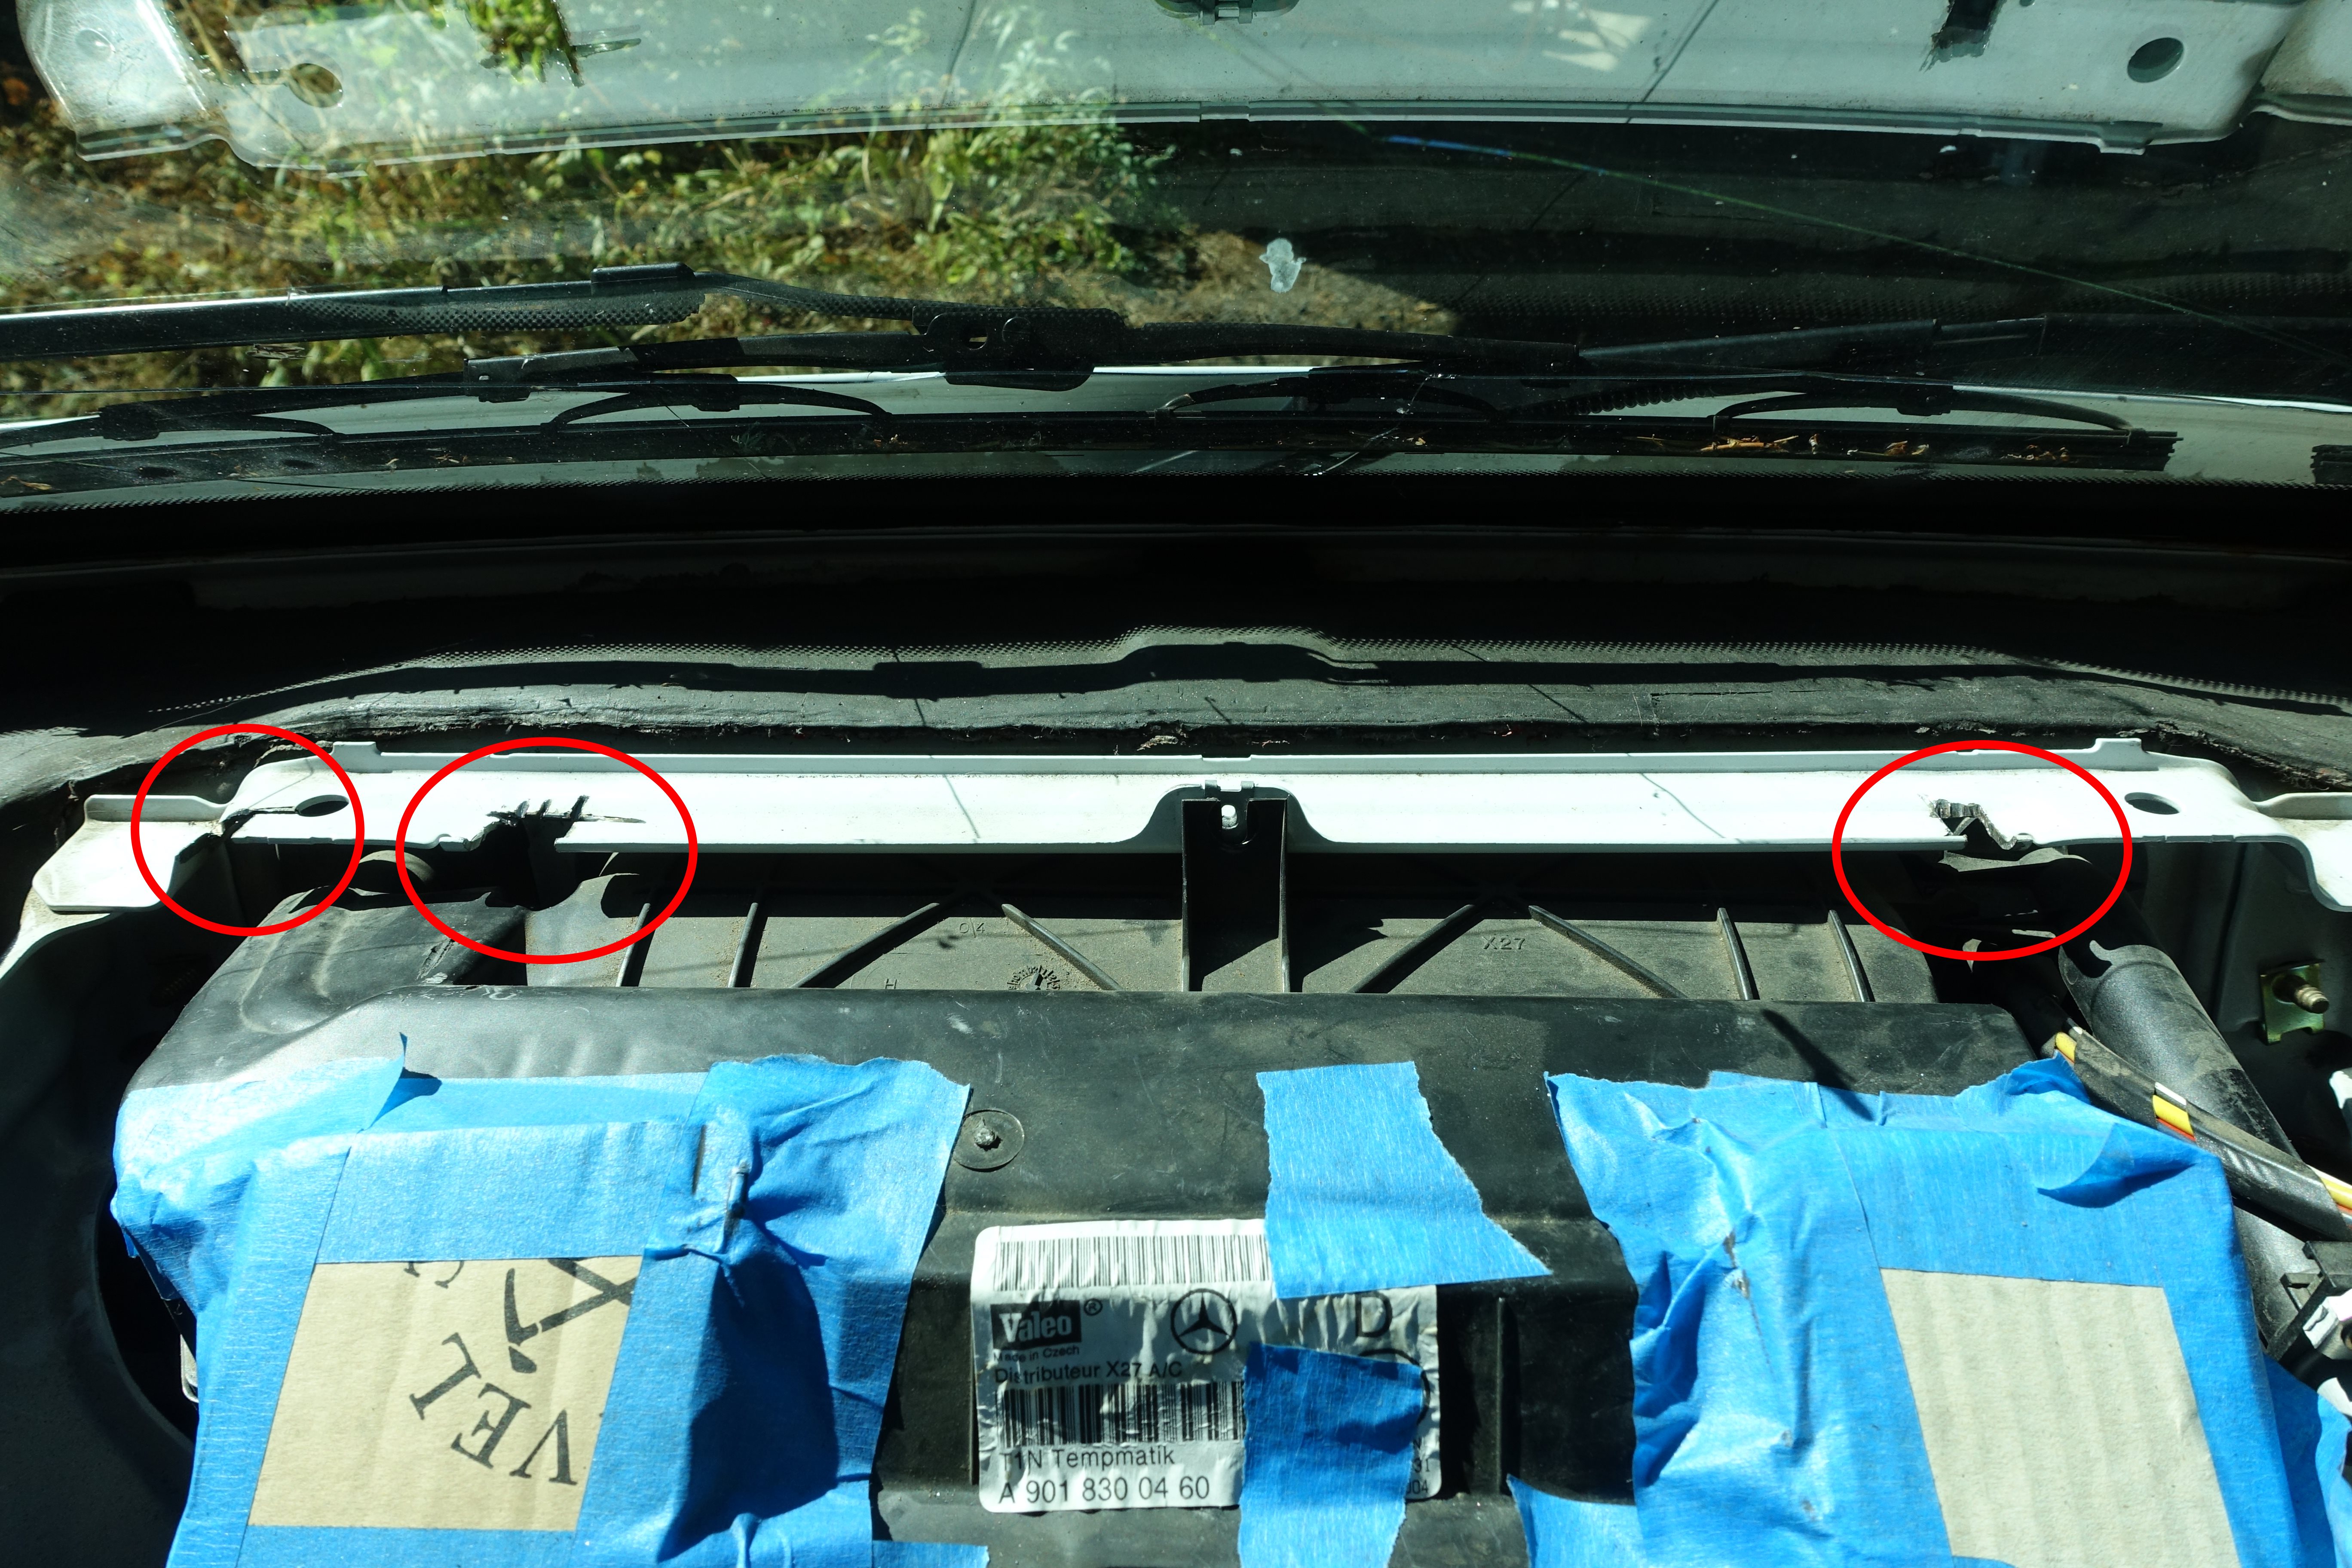
After that, there are 13 6mm hex-head screws and 3 T20 screws to remove. Only the 3 screws requiring the self-made access holes are difficult to get at. I bought a cheap normal length 6mm nut driver and cut the handle off in order to fit under the windshield.

From there, it appears the heater housing cover could be removed. It has seals around the pipes that come in and out, as well as a large seal where the air from the blower enters. I think you could wiggle that stuff loose and remove the cover.

However, I only needed access to the very front of the heater housing.


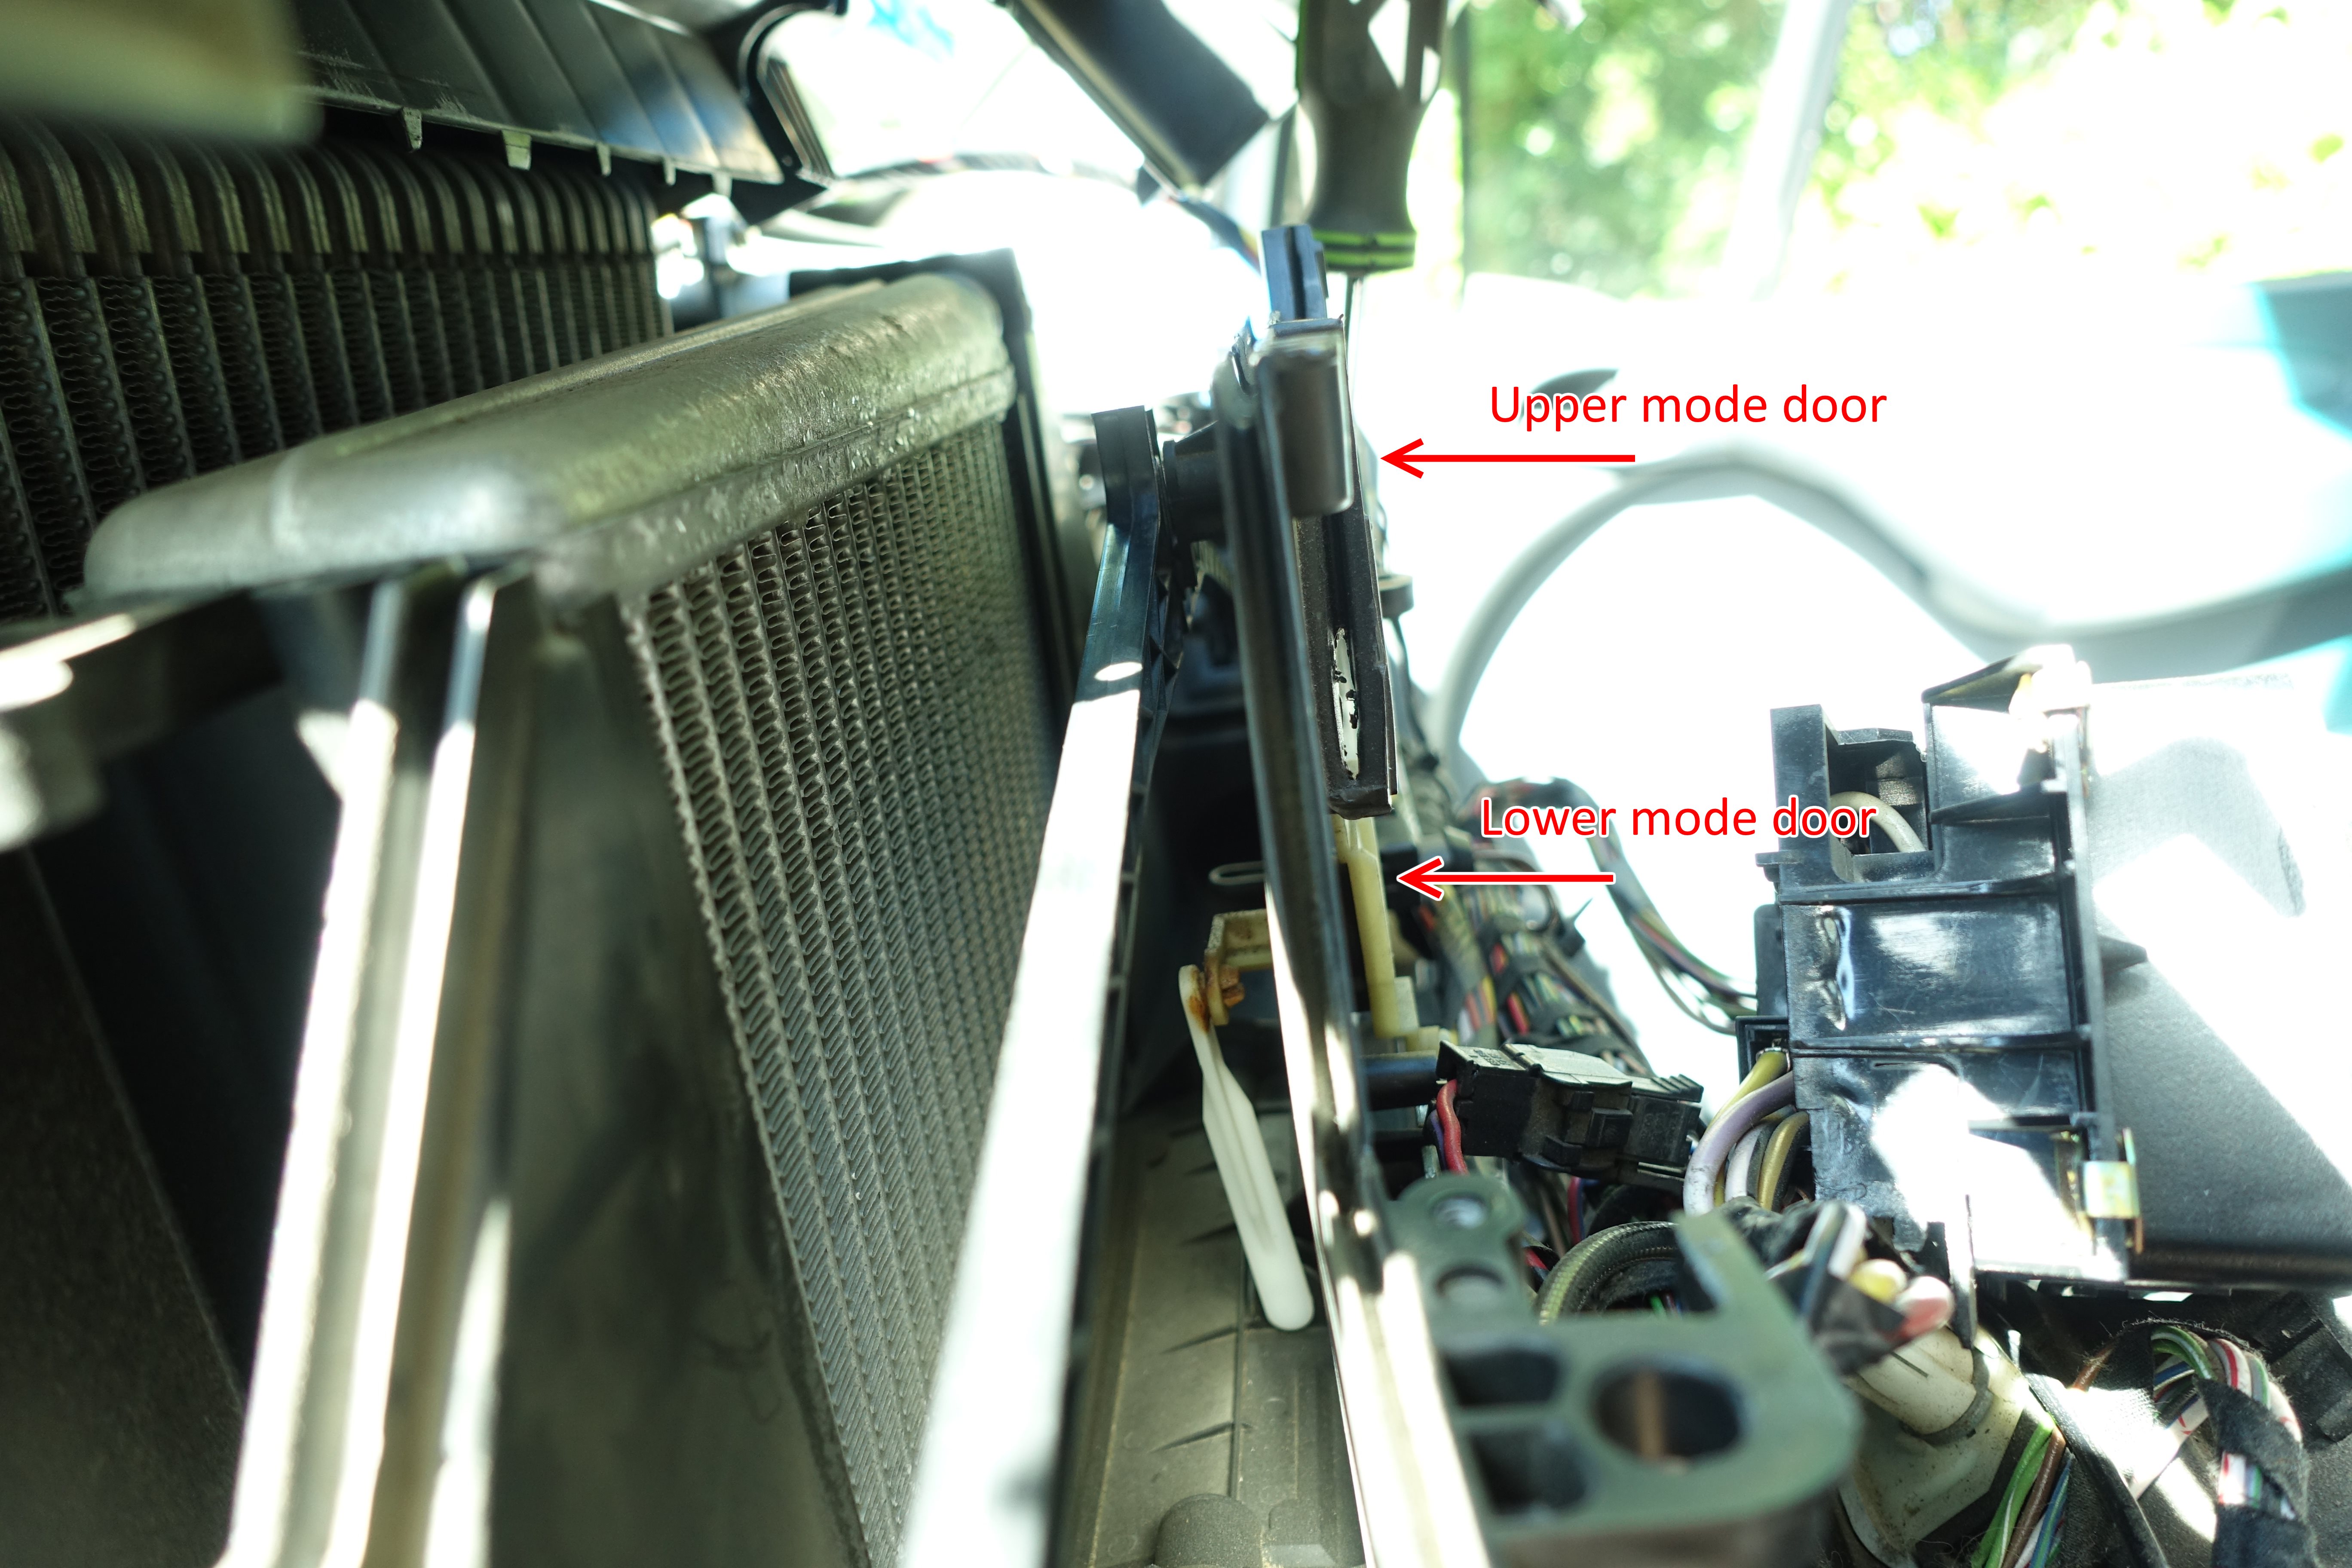
Earlier, I had accidently/on-purpose removed the rotating knob that controls the upper mode doors (ie vents to defrosters). I couldn't figure out how to reinstall it, so I had to get inside. As soon as I could see and touch the thing, its function was apparent. The knob rotates CCW, which pushes a rod-like thing to the right, causing the doors/vents to close. CW rotation pushes the rod-thing left, opening the doors.


The service manual describes a very specific procedure for reattaching the cables which operate the Upper and Lower mode doors from the Vent control on the Heat/AC control panel. I think if everything is not positioned just right, it's possible to pull/push one or both of the upper mode doors too far, causing it to become stuck. This then appears as the Vent control knob being stuck, especially if the cables become bent (mine was bent when I first inspected it).

If this happens, you might be able to fix it without having to remove the complete dash board. The upper mode doors can be accessed through the top front vents, so you only need to remove enough dash to remove the louvers. You might even be able to snake something in there without removing anything.


I made a short video showing how the upper mode doors operate, and also what it looks like when they are rotated too far.

https://www.youtube.com/watch?v=SggJHon2j7o
 

Gwilym & Eddy the Merckx

2000 208 CDi MWB Bus & 2005 313 CDi 4mWB Crew Van
Upper mode doors (defrosters):
Mine appear to be jammed here are a couple photos showing a cable, behind the control knob, which will not move back in to its sleeve... The cable just bends.

Anyone have any ideas?
 

Attachments

gilee

2006 Sprinter 2500 Camper
So I finally got around to experimenting further with removing the heater housing cover, which I first asked about in this thread: https://sprinter-source.com/forum/showthread.php?t=52078
.....
I made a short video showing how the upper mode doors operate, and also what it looks like when they are rotated too far.

Hi Quillaja, can you repost the pictures onto this forum again? Those pictures no longer viewable, and seems like you are the only one who provided info regarding removing the heater housing cover.

I am in the process to do the same procedure you described above.
20210414_192913.jpg
If you can upload the picture will be great appreciated!! Thx!!
 

gilee

2006 Sprinter 2500 Camper
Opened the Heater Housing, and fixed the Vents. Its smooth and just like new.
Some pictures, then what I found that makes the Vent Knob turns like new.
1618534114231.png1618534086388.png
There is no need to cut or drill any holes, a 6mm wrench will work. Just take a bit some time, but works perfectly.
The cover still cannot remove completely, since the rear is "glued" or "sealed" to the firewall. Maybe it can come lose, but I don't want to break the seal, and the cover has enough room to push up in the front for me to fix the vents. (If you need to remove the cover for a bigger fix, it is doable, as nothing is blocking it except the firewall seal)

I was trying many things, but end up the REAL Reason making the Vent so STIFF, or even not able to move, is because age, and no more lubrication on the Vent itself. I tried adding grease on everything else but the vent, helps 10-20%, but the once I took off all the arms, and move the vent itself with my hand, it is STIFF!
1618534354542.png1618534387730.png
I use a thick wire, and put the Grease in.
Now, I can move the Vent Knob without any effort. it's just like new!
 

sarl_cagan

2006 118" SHC in Portland, OR
@quillaja @gilee , This post is like when Batman finally meets Spiderman. Two legends collide. Great descriptions and great photos. Very helpful documentation.

Thanks to you both!
 

quillaja

2004 2500 140WB high roof
@gilee Glad you got your vents working! I think these are the photos from the original post. I think they vanished when the forum software changed, and I wasn't motivated to look around for them since my "huge" photos were just ridiculed before.
 

Attachments

Midwestdrifter

Engineer In Residence
You don't want grease in the vent passages, as it will just pick up dust and eventually stop working. A dry film lube will last a lot longer, and you can find it designed for plastic.

If the flaps are stiff due to rubbing, you can lightly trim them. It's possible to distort the vent duct for more clearance with heat, but that takes some skill.
 

gilee

2006 Sprinter 2500 Camper
You don't want grease in the vent passages, as it will just pick up dust and eventually stop working. A dry film lube will last a lot longer, and you can find it designed for plastic.

If the flaps are stiff due to rubbing, you can lightly trim them. It's possible to distort the vent duct for more clearance with heat, but that takes some skill.
Thanks, will check it out.
after I lubed it, I cleaned it back up. Pictures was before clean up.
So far, it works like new. I can turn the knob 360 with no effort (except that clicking which is designed to be)
 

Gwilym & Eddy the Merckx

2000 208 CDi MWB Bus & 2005 313 CDi 4mWB Crew Van
Hi Quillaja, can you repost the pictures onto this forum again? Those pictures no longer viewable, and seems like you are the only one who provided info regarding removing the heater housing cover.

I am in the process to do the same procedure you described above.
View attachment 178338
If you can upload the picture will be great appreciated!! Thx!!
Gilee, was there a trunk of wiring running below the windscreen alongside those metal clips with bolts through them, left and right?
I am asking because those clips look a lot like where my wiring has chafed and bunt out!
 

Attachments

Last edited:

gilee

2006 Sprinter 2500 Camper
Gilee, was there a trunk of wiring running below the windscreen alongside those metal clips with bolts through them, left and right?
I am asking because those clips look a lot like where my wiring has chafed and bunt out!
Hey Gwilyn, i am not sure exactly which clip and its location you asked about. If you can be more specific, I can check the pics i took.

Do you mean if any wires along the bottom of the windshield from passenger to driver side? Right below the glass?
 

Gwilym & Eddy the Merckx

2000 208 CDi MWB Bus & 2005 313 CDi 4mWB Crew Van
Hey Gwilyn, i am not sure exactly which clip and its location you asked about. If you can be more specific, I can check the pics i took.

Do you mean if any wires along the bottom of the windshield from passenger to driver side? Right below the glass?
Yes about 8 inches below the cleaned spot in this photo. I polished a circle out of the dust directly above where my Borescope found the burn out wire.
It’s difficult to know when the borescope view is level or rotated so I wasn’t sure the correct orientation of the clip which my wires had rubbed up against but I am pretty confident it’s the same clip which is securing a bolt/screw through the firewall in your photo?

I am right hand drive.

Have been discussing this in a thread on T1N Talk about smoke coming out of my defrost vent and I am at the stage of cutting a hole in the lower dash panel because, i assume, removing the main instrument panel which is what you clearly did is a task too far for me. I am not a mechanic or auto electrician.

I’ve re-oriented my borescope photo to match your clip. there is one to the right of your grease pot in the last of these 3 photos:
 

Attachments

Last edited:

gilee

2006 Sprinter 2500 Camper
Yes about 8 inches below the cleaned spot in this photo. I polished a circle out of the dust directly above where my Borescope found the burn out wire.
It’s difficult to know when the borescope view is level or rotated so I wasn’t sure the correct orientation of the clip which my wires had rubbed up against but I am pretty confident it’s the same clip which is securing a bolt/screw through the firewall in your photo?
Hey @Gwilym , if I understand your question correctly, you are asking if I removed the Heater Housing from the Dash area? So you can know the wiring below the heater housing?

If that is the case, I didn't, and never seen the are behind/below the housing area. In order to remove that, it will involve disconnecting the r134a, coolant and also I think there are some bolts from the engine bay side. So I left it alone.
I did took some pictures from different angles of that corner of the heater housing you asking for, hope they can help you on your short. I am following that thread you posted as well, and cannot imagine what a pain it must be...

Wish you the best. and if you need anything that might be able to help, feel free to ask. This forum has some of the most amazing helpful people + experience you cannot find anywhere.

1634232043509.png1634232078324.png1634232111406.png
1634232147147.png
 

Gwilym & Eddy the Merckx

2000 208 CDi MWB Bus & 2005 313 CDi 4mWB Crew Van
Hey @Gwilym , if I understand your question correctly, you are asking if I removed the Heater Housing from the Dash area? So you can know the wiring below the heater housing?

If that is the case, I didn't, and never seen the are behind/below the housing area. In order to remove that, it will involve disconnecting the r134a, coolant and also I think there are some bolts from the engine bay side. So I left it alone.
I did took some pictures from different angles of that corner of the heater housing you asking for, hope they can help you on your short. I am following that thread you posted as well, and cannot imagine what a pain it must be...

Wish you the best. and if you need anything that might be able to help, feel free to ask. This forum has some of the most amazing helpful people + experience you cannot find anywhere.

View attachment 197006View attachment 197007View attachment 197008
View attachment 197009
I just wondered if any of your wiring loom branches had been anywhere near your gold coloured clips on the firewall, which I mentioned.

The terminology is tricky sorry if I haven’t got it exactly right. There seem to be two layers of dash to remove before we get to the stage in your photos? I am at stage one in my photos.

The second layer seems to be a bigger endeavour All together So I am thinking of cutting out part of the lower dash to get to the area where my similar looking clip is, drivers (right) side, because that clip appears to be where my wires have burnt?

Thanks to your photos I am very confident that is what I am looking at, through a gap in my dash, with the borescope (endoscope).:cheers:
 

220629

Well-known member
Fish new and splice. ...
Fish new what wires? The red wire is obvious, but the picture shows other damage. The collateral damage needs to be assessed before what wires are needed can be determined. If it was just the red conductor I'd agree with you.

vic
 

tom2turbo

Active member
Fish new what wires? …. If it was just the red conductor I'd agree with you.

vic
Yes there are multiple threads and various bits of advice on this van’s wiring issue. I am stepping back for now to avoid the marais. Thanks Vic
Tom

seehttps://sprinter-source.com/forums/index.php?threads/94428/post-1094965
 
Last edited:

gilee

2006 Sprinter 2500 Camper
I just wondered if any of your wiring loom branches had been anywhere near your gold coloured clips on the firewall, which I mentioned.

The terminology is tricky sorry if I haven’t got it exactly right. There seem to be two layers of dash to remove before we get to the stage in your photos? I am at stage one in my photos.

The second layer seems to be a bigger endeavour All together So I am thinking of cutting out part of the lower dash to get to the area where my similar looking clip is, drivers (right) side, because that clip appears to be where my wires have burnt?

Thanks to your photos I am very confident that is what I am looking at, through a gap in my dash, with the borescope (endoscope).:cheers:
No problem.
You mean this golden clip?
Screenshot_20211014-202755_Chrome.jpg

None. I believe many of the wires I see from your pictures (on your other post regarding the short/smoke). They are aftermarket. All original wiring are wrapped and secured to something within the Dash. Only the connector ends are lose for unplugging.


ADDED: also, take your time. If i am you, I will just remove entire Dash and do the wiring right. Consider the situation you in, it could be way worst if you on highway, middle of no where and worst is cause fire when you not around!! Scary stuff.

The Dash isn't that hard. Took me less than few hours to put everything back, and I think 1 or 2days to remove them.

Just be patience and take your time...
 
Last edited:

Top Bottom