
mean_in_green
>2,000,000m in MB vans
Here's something which I've been mulling over for the last six months: how do you carry a spare if you have a SuSi rear axle, as the front and rear wheels are different sizes?
First things first: you don't get ANY spare wheels if you buy a SuSi variant! I don't know why either - ask DC. It's rubbish. Not only that, but you don't get the two retaining bolts for the spare wheel carrier or the hinge brackets welded to the chassis rails either. You do get the holes for the bolts though...
I decided the best practice for me would be to carry two spares. If it initially seems "too prepared" consider that this is still one less wheel overall than a dually and I have the potential to resolve two puncture events on one journey - surely the sensible approach?
The next problem was where to put the spare wheels? I knew one thing - I didn't want to spend the next ten years regularly moving them around inside the back of the van. No, that's a non-starter. Sod's Law dictates that the spares will be buried underneath other immoveable stuff when required... What to do?
With some careful measuring I thought it possible that I could fit both my spares under the van behind the rear axle (extended body remember). I mocked up a 2D ladder frame out of 30mm box just to try the theory out by placing the frame and both spares on a jack and trying them for size - it looked like it would work so I made the frame into a 3D form to accommodate the differences in tyre width and the way the smaller wheel tilts up into the body behind the bumper. I then emulated the factory hinge arrangement using genuine DC carrier brackets clamping over some M12 bar all bolted to my own design "hanger" which slots in between two chassis rails above the rear axle.
I bought a couple of the standard spare wheel carrier retaining bolts and the hook ends that fit to them. I designed my rack to have two M12 bolts that the hooks latch on to in the same way the standard rack is held. After another mocking up session I was happy that both wheels were firmly gripped and held in place when the standard bolts were tightened up.
Cue an industrial dose of seam sealer / three coats of epoxy two pack mastic sealer / some internal chassis wax treatment and here's the finished result (the SuSi wheel is nearest the axle):
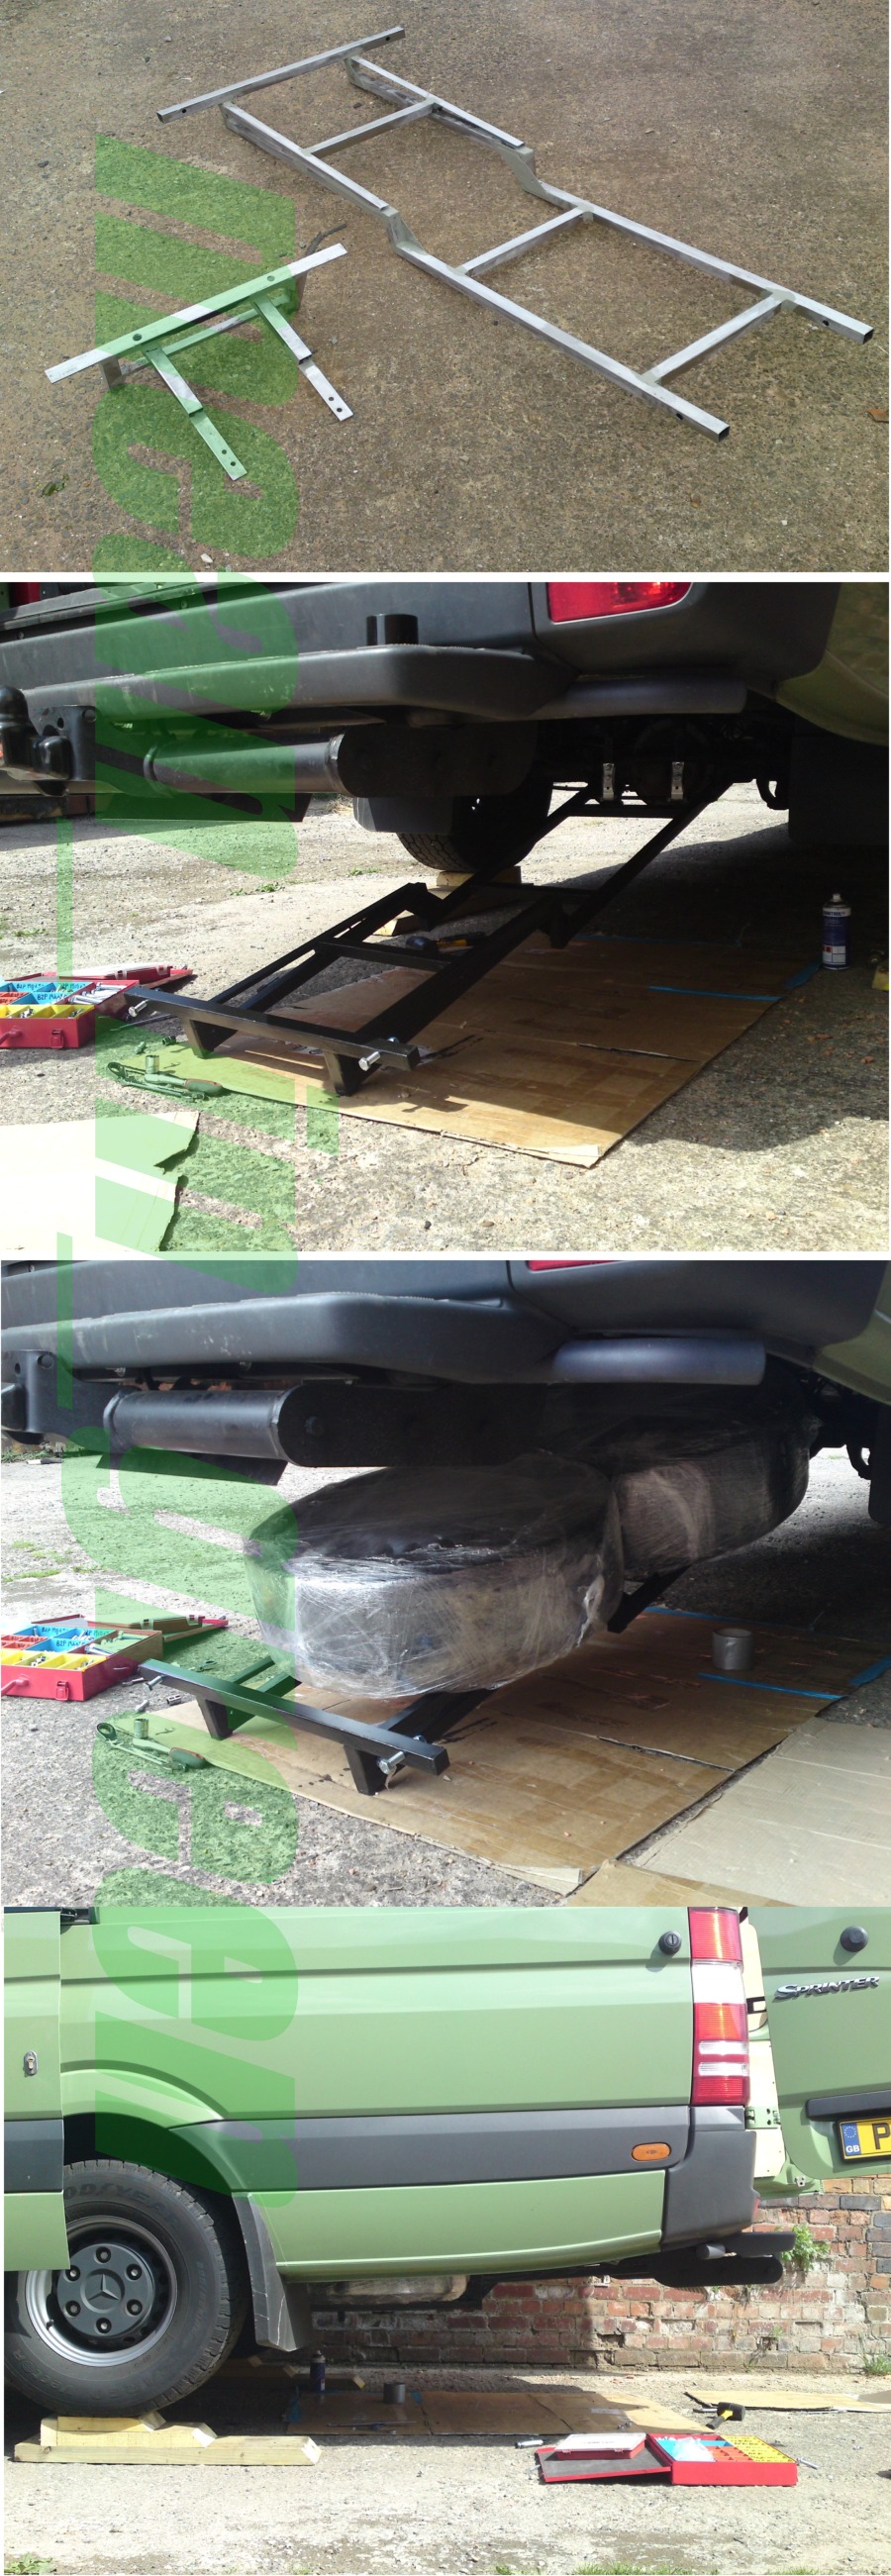


As you can see the edge of the SuSi wheel is just visible in the side profile view, the smaller wheel is completely out of sight just as the standard carrier arrangement.
The pros are that I have an entirely clear loadspace and a more theft resistant solution than standard wheel carrier because of the heavy duty nature of the rack.
The cons are that I have altered the weight distribution in a theoretically undesirable way, however this is something I'm prepared to accept and in context (capable four series weight variant & lowest possible placement of the weight) I can live with it. Also the loaded weight of the rack is considerable, but I am easily able to use either the jack or a shoring bar I carry to provide the necessary help.
Its first road test was a drive to Lisbon and back from the UK - wheels absolutely rock solid in position upon return. Actually I didn't just drive 4,000 miles solely to test it out, but it was a good opportunity to see how it performed... Of course easily adaptable - you could carry two "conventional" spares couldn't you, if venturing off the beaten track?
First things first: you don't get ANY spare wheels if you buy a SuSi variant! I don't know why either - ask DC. It's rubbish. Not only that, but you don't get the two retaining bolts for the spare wheel carrier or the hinge brackets welded to the chassis rails either. You do get the holes for the bolts though...
I decided the best practice for me would be to carry two spares. If it initially seems "too prepared" consider that this is still one less wheel overall than a dually and I have the potential to resolve two puncture events on one journey - surely the sensible approach?
The next problem was where to put the spare wheels? I knew one thing - I didn't want to spend the next ten years regularly moving them around inside the back of the van. No, that's a non-starter. Sod's Law dictates that the spares will be buried underneath other immoveable stuff when required... What to do?
With some careful measuring I thought it possible that I could fit both my spares under the van behind the rear axle (extended body remember). I mocked up a 2D ladder frame out of 30mm box just to try the theory out by placing the frame and both spares on a jack and trying them for size - it looked like it would work so I made the frame into a 3D form to accommodate the differences in tyre width and the way the smaller wheel tilts up into the body behind the bumper. I then emulated the factory hinge arrangement using genuine DC carrier brackets clamping over some M12 bar all bolted to my own design "hanger" which slots in between two chassis rails above the rear axle.
I bought a couple of the standard spare wheel carrier retaining bolts and the hook ends that fit to them. I designed my rack to have two M12 bolts that the hooks latch on to in the same way the standard rack is held. After another mocking up session I was happy that both wheels were firmly gripped and held in place when the standard bolts were tightened up.
Cue an industrial dose of seam sealer / three coats of epoxy two pack mastic sealer / some internal chassis wax treatment and here's the finished result (the SuSi wheel is nearest the axle):
As you can see the edge of the SuSi wheel is just visible in the side profile view, the smaller wheel is completely out of sight just as the standard carrier arrangement.
The pros are that I have an entirely clear loadspace and a more theft resistant solution than standard wheel carrier because of the heavy duty nature of the rack.
The cons are that I have altered the weight distribution in a theoretically undesirable way, however this is something I'm prepared to accept and in context (capable four series weight variant & lowest possible placement of the weight) I can live with it. Also the loaded weight of the rack is considerable, but I am easily able to use either the jack or a shoring bar I carry to provide the necessary help.
Its first road test was a drive to Lisbon and back from the UK - wheels absolutely rock solid in position upon return. Actually I didn't just drive 4,000 miles solely to test it out, but it was a good opportunity to see how it performed... Of course easily adaptable - you could carry two "conventional" spares couldn't you, if venturing off the beaten track?
Last edited by a moderator:
 My wife and I were in Lisbon about two summers ago. What a great trip that was. We started off in Faro (flew in from Phoenix, AZ) stayed with friends and drove up the whole country. We did manage to drive into Seville Spain, however those people were just snots. Pretty country though. My wife and I decided our retirement will be outside of the U.S. There is nothing like being able to drive through all of Europe.
 (save your plans on the carrier...If they get the SuSi's here, I may need a set!)
 ... i could see other rig owners asking to buy your tire rack....heck sell them blue prints