MillionMileSprinter
Millionmilesprinter.com
I have been posting for a while how great/inexpensive my screen and camera setup is, I figured I might as well do a basic write up on it for the T1N. I have installed quite a few of these, and the install is pretty much the same no matter what size or year T1N you have.
I also had someone PM me to ask some specific questions, so it seemed like a good idea to do a complete write up.
Here is the Screen: http://www.amazon.com/gp/product/B007SLDF7O/
Here is the Camera: http://www.amazon.com/gp/product/B005CTKYB4/
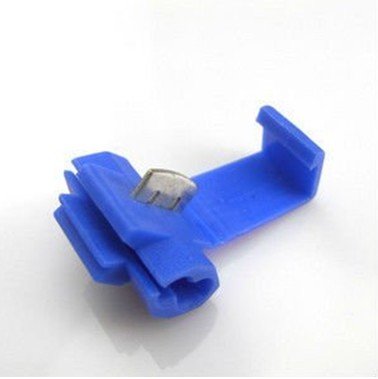
I also like these "piggyback" connectors: http://www.amazon.com/gp/product/B005GDFMHM/
Order the parts linked and you will also need two 10ft sections of 16guage wiring, two different colors. Red and yellow are good. I like to use these "piggyback" connectors to tap into existing power lines: http://www.amazon.com/gp/product/B005GDFMHM/
The camera just needs a positive and negative hookup. Solid Brown wires in the Sprinter are almost always (negative) ground.
You will have to drill a small hole for the camera wire to pass through the brake light. I like to do it on the side, down low so there is little chance of water getting in. (see photo) A little silicone around the hole seals it up, too. You will have to drill a hole in the silver bulb surround to get the wires inside. I wrapped the wires in tinfoil to keep them from getting too hot next to the brake light bulb. Once inside, you can access the camera wiring and brake light wiring from the 2 holes above the back doors.(see photo) Use the blue piggyback to tap the camera negative into the brake light negative. Use the extra 10' red wire to connect to the positive wire of the camera. I run it over to the passenger side tail light, snaking it under the headliner and own inside the corner pillar. Unhook the backside of the tail light circuit board. Turn on the parking lights and see which bulb turns on. Trace the lines back to wire and put a piggyback on that wire, connecting it to the red positive from the camera (see the photos- my wire was white, not red) This will allow you to turn the camera off and on with the lights. If you want it only to turn on in reverse, just find which wire is the reverse light wire and tap into that one. I personally have it hooked up to the tail light because I want it always on when I'm driving.
The only other wire off the camera is the A/V wire. I run it over to the rear passenger corner and then along the roof edge with other wires towards the front of the Sprinter.(see where my finger is pointing in the photo) You can hook it into the channel that they are hooked into. The A/V wire that comes with the camera (or maybe its the screen) will make it all the way from the back to the front of the Sprinter.
Take the dome/reading light (located right above the rear view mirror) out and (here's one of the hardest parts) you have to use a "fish" to get the A/V wire from the top of the slider door/back of cab above the headliner and dangling out through the hole where the dome light goes.
DO NOT CONNECT THE SCREEN WIRING through this hole. Just use it for easy access. (see the photo) The fat, black wiring bundle that comes with the screen should go out of the headliner at the windshield.
I use the positive and negative from the dome light to power the screen. Just use your multimeter to find which wire is always on and piggyback the red wire from the screen into that. The black wire piggybacks into the brown/ground wire to the light. The last wire (I think it's blue) on the screen is the hardest. You have to connect it to a wire that only turns on with the key. The easiest wire I have found is the one leading to the radio. To do this, you have to snake it across the headliner to the passenger side, take off the A pillar and snake it under there, and then go behind the glove box over to the radio wiring. It helps to take the glove box out and also to remove the center grill/vent control to access the stereo wiring. I don't remember which wire it is, but it's often yellow (but Mercedes often does it's own thing). Use a multimeter to figure it out. (see my photo)
After that, you can decide how you want to attach everything. I never permanently attach the camera or screen until I have it all hooked up and see that it's working and all my angles are the way I want them to be.
Hope this helps.
I also had someone PM me to ask some specific questions, so it seemed like a good idea to do a complete write up.
Here is the Screen: http://www.amazon.com/gp/product/B007SLDF7O/
Here is the Camera: http://www.amazon.com/gp/product/B005CTKYB4/
I also like these "piggyback" connectors: http://www.amazon.com/gp/product/B005GDFMHM/
Order the parts linked and you will also need two 10ft sections of 16guage wiring, two different colors. Red and yellow are good. I like to use these "piggyback" connectors to tap into existing power lines: http://www.amazon.com/gp/product/B005GDFMHM/
The camera just needs a positive and negative hookup. Solid Brown wires in the Sprinter are almost always (negative) ground.
You will have to drill a small hole for the camera wire to pass through the brake light. I like to do it on the side, down low so there is little chance of water getting in. (see photo) A little silicone around the hole seals it up, too. You will have to drill a hole in the silver bulb surround to get the wires inside. I wrapped the wires in tinfoil to keep them from getting too hot next to the brake light bulb. Once inside, you can access the camera wiring and brake light wiring from the 2 holes above the back doors.(see photo) Use the blue piggyback to tap the camera negative into the brake light negative. Use the extra 10' red wire to connect to the positive wire of the camera. I run it over to the passenger side tail light, snaking it under the headliner and own inside the corner pillar. Unhook the backside of the tail light circuit board. Turn on the parking lights and see which bulb turns on. Trace the lines back to wire and put a piggyback on that wire, connecting it to the red positive from the camera (see the photos- my wire was white, not red) This will allow you to turn the camera off and on with the lights. If you want it only to turn on in reverse, just find which wire is the reverse light wire and tap into that one. I personally have it hooked up to the tail light because I want it always on when I'm driving.
The only other wire off the camera is the A/V wire. I run it over to the rear passenger corner and then along the roof edge with other wires towards the front of the Sprinter.(see where my finger is pointing in the photo) You can hook it into the channel that they are hooked into. The A/V wire that comes with the camera (or maybe its the screen) will make it all the way from the back to the front of the Sprinter.
Take the dome/reading light (located right above the rear view mirror) out and (here's one of the hardest parts) you have to use a "fish" to get the A/V wire from the top of the slider door/back of cab above the headliner and dangling out through the hole where the dome light goes.
DO NOT CONNECT THE SCREEN WIRING through this hole. Just use it for easy access. (see the photo) The fat, black wiring bundle that comes with the screen should go out of the headliner at the windshield.
I use the positive and negative from the dome light to power the screen. Just use your multimeter to find which wire is always on and piggyback the red wire from the screen into that. The black wire piggybacks into the brown/ground wire to the light. The last wire (I think it's blue) on the screen is the hardest. You have to connect it to a wire that only turns on with the key. The easiest wire I have found is the one leading to the radio. To do this, you have to snake it across the headliner to the passenger side, take off the A pillar and snake it under there, and then go behind the glove box over to the radio wiring. It helps to take the glove box out and also to remove the center grill/vent control to access the stereo wiring. I don't remember which wire it is, but it's often yellow (but Mercedes often does it's own thing). Use a multimeter to figure it out. (see my photo)
After that, you can decide how you want to attach everything. I never permanently attach the camera or screen until I have it all hooked up and see that it's working and all my angles are the way I want them to be.
Hope this helps.
Attachments
-
 158.4 KB Views: 1,257
 -
 130.4 KB Views: 1,134
 -
 106 KB Views: 1,097
 -
 118.2 KB Views: 1,074
 -
 60.4 KB Views: 1,116
Last edited: