Window Regulator Fix

MillionMileSprinter

Millionmilesprinter.com
Don't know if this also works on the newer Sprinters, but I've got an '02. YMMV

Symptom- driver's side window kept falling down. Motor ran fine, but didn't affect the window moving up or down. So I searched the forum and found a cheap fix with some plastic closet wheels. I went looking at Home Depot for the wheels, and I'm so glad that the poster mentioned that the wheels were 5/8". All I could find were 7/8" wheels and another plastic slider piece that I bought on a whim. Good thing I did. The wheels were too big.
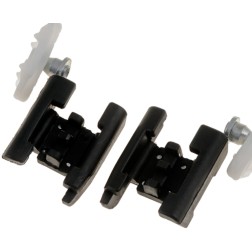
The rectangular plastic piece turned out to be perfect. I clamped down a rough file in my vice and used it to file down the piece to match the size of the broken plastic piece from the window.
Then I took the threaded rectangle and used my grinder to grind that down to the right size, too. I wanted it recessed, so I threaded a screw into it, held the screw with some pliers and used a torch to heat up the threaded piece. Then I pressed it into the plastic piece. VIOLA! I was very happy with the results.
I found another screw that was long enough and some tiny washers that worked and within an hour, the window was working again!
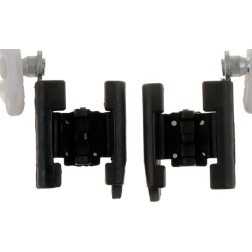
Enjoy the pics. The first two are of the modified piece next to the original. The next two show the recessed threaded square next to the original. The last is of the original, the modified and the broken MB piece from the window.
Enjoy.
Joel in Philly
 

Attachments

johnschroader

regular fellow
Re: Another window regulator fix with pics

Good technique. I recently used the shower curtain roller to repair mine - as advised on this forum. Works great. But I had considered a setup much like what you did. Glad to see that it works well. That was going to be my first line of defense if the roller didn't work.
 

jbarnut

New member
Re: Another window regulator fix with pics

Good technique. I recently used the shower curtain roller to repair mine - as advised on this forum. Works great. But I had considered a setup much like what you did. Glad to see that it works well. That was going to be my first line of defense if the roller didn't work.
What I did was using a shower and tub curtain 3/4 inch roller.I ground to fit the rail and .Ground off the pin from the arm and push the pin out and now I have 3/8 hole in the arm .Then I use a 8-32 screw and a washer and works like charm
 

Hit The Road Jack

2006 Roadhouse Sprinter
Re: Another window regulator fix with pics

What I did was using a shower and tub curtain 3/4 inch roller.I ground to fit the rail and .Ground off the pin from the arm and push the pin out and now I have 3/8 hole in the arm .Then I use a 8-32 screw and a washer and works like charm
Very creative jbarnut !

As a 2006 Sprinter owner, I'll choose to order my defective Window Regulator from http://www.partstrain.com/store/index.php?VN=4294967115+4294964648+4294964354+4294967132+4294964351&Nr=AND(universal:0)&N=0&Ntt=Window%20Regulator
 

Hit The Road Jack

2006 Roadhouse Sprinter
Re: Another window regulator fix with pics


***Warning*** The Window Regulator plastic parts I ordered from 'Partstrain' for my 2006 Sprinter were way too large to fit into the track !

I ended up using a similar sized to the original half-round Carriage bolt & washer for the fix...IMHO metal is far better for this situation, works terrific ;)
 

George Carter

New member
With information from this page I was able to repair my regulator. I used rollers I purchased from Lowe's that are for a closet door. It's only been installed a couple days, but it's working. Cost $4 for rollers, $10 for tap, and correct drill bit for tap. Hope it holds, $14 beats $230 for new regulator. Not really that difficult. Good Luck!
See my attachment for directions.
 

Attachments

autocamp

un-Airstream'ed & un-Dodged NAFTA JC
Hi all,

I am writing this post entertaining a different repair approach.

While returning from camping, my driver side widow succumbed to this same failure. It was a royal pain on the ass to drive 60 miles home at highway speed with the window wide open. Fortunately the ambient temperature was at least comfortable.

The plastic slider broken into two. I read the few threads on this forum of how most fabricated the replacement slider out of closet wheel and slider. I have not ruled out going this route, but I revisited the more costly alternatives, including finding out the cost of the replacement regulator. As most T1N owners I have power window.

The entire replacement regulator for the driver side is 05104345aa (vs 05104343aa for the manual window). Referring to the 04 parts manual the diagram for both parts share the same depiction. Yet the price for power window 05104345aa costs about $200 while the one for manual window 05104343aa costs about $30. Without a reliable pictures of the two parts I am wondering if the huge cost difference is the inclusion of the electric motor on the former.

Doing a bit more web search I found this ebay seller selling the power window one for $159.97. The picture shows the including of the motor. This seems a reliable clue of the substantial price difference.

http://cgi.ebay.com/ws/eBayISAPI.dl...akeTrack=true&ssPageName=VIP:watchlink:top:en

Examining my regulator in the door I see the lift arm is rivetted to the gear plate with two rivets. I am wondering if the arm on the manual regulator can be drilled out and bolted/rivetted to the powered version.

Reason would have it that they are likely a common part between the two versions. For ~$40 I would prefer to stick with the factory slider. I worry about home made one standing up to extreme cold weather.
 

autocamp

un-Airstream'ed & un-Dodged NAFTA JC
My hunch seems to be paying off. I went an picked up the manual window regulator today from from local dealer. Instead of over $200 :thumbdown:for the powered version it comes to $42.60 list.

At the counter I immediately examine the construction. As I suspected the actuation arm look identical to the one on the powered window that has the broken plastic slider! The arm rivetted to the gear plate with 2 rivet which was what I plan to drill out and swap the arm to the stock assembly. So far so good.

There is a surprise. The manual regulator does not come with a plastic slider! I rummaged thru the package and cannot find a loose piece. I thought to myself I just wasted $42.60:cry:. Well, it was a risk I factored into my decision to order the part.:smilewink:

Than I thought what if the manual one, due to much lower stress, does not have the plastic slider? I didn't take careful stock of the mushroom rivet where the plastic slider fastened to, but the one on the new manual regulator looks a bit larger. I decide to take it home and see.

Sure enough the mushroom rivet on the manual regulator fits right into the sliding channel. It is designed to work without the plastic slider. The actuation arm that is rivetted to the gear plate is identical to the old one.

I am wondering if the new regulator for the power window also now omits the failure-prone plastic slider.:thinking:

It is too hot to work on it right now so I defer to sunset today to do the installation. Stay tuned.
 

L8RSK8R

2006 2.7 Mercedes 2500
I scrambled to 'fix" my window slider today. Found a $2.50 poker chip, cut it to fit the rail on window. Cut out a U shaped notch in the poker chip, to engage the actuator pin. In order to engage the slider pin, and get the chip into the window rail, I removed the actuator assembly and moved it slightly , so the chip could slide into the rail.
Added a good amount of grease to the rail, and it's working like a charm.....for now.
 

220629

Well-known member
... Found a $2.50 poker chip, cut it to fit the rail on window. ...Added a good amount of grease to the rail, and it's working like a charm.....for now.
Nice.

I believe the original poker chips were made of clay. Don't worry though, you'll be fine until it rains... San Diego is generally dry. :dripsarcasm::dripsarcasm:

:cheers: vic

A compilation from two threads.

Bending the Arm and Lubrication.

...
Edit: got it done with a small zip tie around the plastic piece that broke. But after bending the arm, the zip tie is superfluous - the arm is now pressing tightly into the track on its own accord and there's no way it's going to come out of the track.
If not bent in enough apparently a slammed door can knock it loose.

I bought the replacements and realized I needed to drill out the remaining broken part in the actuator arm. Forgive the lack of accurate terminology. Time was short, so I slightly bent to arm enough to keep it in the track and with a little lithium grease, away I went.

The only time it has popped out was when a mechanic slammed the door. That was a one time lesson. These doors do not have to ever be slammed shut. If I ever feel so inclined, I will drill out the offending piece and install the Ebay piece. Bouncing around Baja last winter did not affect this temporary fix. Only a careless mechanic has caused me to go back in there and push it back into place.
After reading a lot of things here & on Youtube, we just bent the arm toward the outside of the door - it's pretty springy so we put a block of wood behind it & then used a pipe-wrench for leverage and bent it so that it holds the stud in the window-bottom track where the broken plastic slide used to be. The window rides up & down on the stud, rather than a 'fancy' slide.

Works great. No cost. Hardest part was getting the door panel back on.

-Oly
Lubriplate is an excellent choice.

I used regular old *modern* wheel bearing grease to lube the 2004 and 2006 tracks. In my experience modern wheel bearing greases do not dry out or harden.

If the tracks are periodically lubed, I see no reason that the bend the arm trick and using the metal button only won't be good. The T1N's are old. A greased metal button as a slide will outlast the service life of an old T1N. :2cents:

Lubing the tracks isn't difficult.

Lube Grease Window Track and Parts
https://sprinter-source.com/forums/showthread.php?t=75849

:cheers: vic
 
Last edited:

tom_tui

New member
Hi all, does anyone know how I could get the driver side window fell to the bottom of the door out? Thanks! :)
 

220629

Well-known member
Hi all, does anyone know how I could get the driver side window fell to the bottom of the door out? Thanks! :)
One certain way is remove the inner door panel and lift it up manually to get it back into position.

It *may* be possible to fold some very sticky tape (Gorilla Tape has good reviews) over the end of a flat spreader blade with sticky side out, insert it down next to the window glass, push the tape against the glass with another tool to stick it to the glass, and then carefully lift the glass until you can grasp the top edge of the window. I haven't tried that though.

Have fun. vic
 

Lojack72

'02 DIY adventure van, 300K miles (210K by me)
While my '02 has had the shower door roller on the driver's side for a few years, thought I'd share this here:
http://www.thingiverse.com/thing:683339
I'm getting ready to drop the hammer on a $350 Printrbot 3D printer, love that someone has already created the CAD file for this part.
 

flemsmith

Member
So my driver's side window regulator plastic thingie broke yesterday. Googled how to take off front door panel from the visitor's center at the state park where we were camped. Took it off easily, put the rod back in the lift half of the broken plastic piece, it lifted the window fine, and we came home. Happy to find this thread. Rather than $300, I'm thinking I'll try one of the fixes y'all suggest. The 3D printed one would be nice, but I have no printer...Guess I'll go to Lowes and see what I can find. Thanks for the inspiration!

roy
 

fuzzyjohn

New member
So, I've found another(better) solution!

After trying to find the right size rollers for my 2005, and not having any luck I started searching for window regulator slides/rollers to find something similar to the plastic piece that was broken. I eventually found something very close. It took very little modifying but took less than 5 minutes. It is a WINDOW REGULATOR GUIDE from a 93-94-95-96 CADILLAC FLEETWOOD 3 - I found them on eBay(3 of them for $10)

- I had to sand/file about .5mm off each side to make it slide in the channel smoothly.
- Then I took a small allen head bolt with about a 1/4" - 3/8" shoulder. I needed to Dremmel the head of the bolt a little for it to fit in the regulator guide. After the bolt head would slide into the guide and rotate easily. I tightened a nut against the shoulder. Cut the bolt so there would be no extra bolt sticking out after I put it through the regulator arm and installed a nylock nut.

With the track cleaned and greased everything works as good as new.

I was so excited to have a working window again I didn't take any pictures of the actual fix... I would be glad to take it apart if anyone would like more details.

Attached are some pictures of the unaltered Cadillac regulator slide.

https://sprinter-source.com/forums/picture.php?albumid=308&pictureid=1735
 

LAM-PARK

New member
So, I've found another(better) solution!

After trying to find the right size rollers for my 2005, and not having any luck I started searching for window regulator slides/rollers to find something similar to the plastic piece that was broken. I eventually found something very close. It took very little modifying but took less than 5 minutes. It is a WINDOW REGULATOR GUIDE from a 93-94-95-96 CADILLAC FLEETWOOD 3 - I found them on eBay(3 of them for $10)
After looking over all of these options - I am going to try this route. I have found the following part numbers that appear to interchange:

Dorman 74442 - Available @ O'reilly Auto Parts
http://www.oreillyauto.com/site/c/detail/MTM0/74442.oap?ck=Search_74442_-1_-1&keyword=74442

NAPA Solutions NOE 730221


O'reilly can have the part to me this afternoon so I have ordered it and will hopefully find out tonight if my $7 was well spent.
 

skill3

2006 Dodge T1N 2500 118"
So, I've found another(better) solution!

After trying to find the right size rollers for my 2005, and not having any luck I started searching for window regulator slides/rollers to find something similar to the plastic piece that was broken. I eventually found something very close. It took very little modifying but took less than 5 minutes. It is a WINDOW REGULATOR GUIDE from a 93-94-95-96 CADILLAC FLEETWOOD - I found them on eBay(3 of them for $10)


Attached are some pictures of the unaltered Cadillac regulator slide.

https://sprinter-source.com/forums/picture.php?albumid=308&pictureid=1735
I have replaced so many of those on 1991-1996 Caprices, SS, Fleetwoods, Roadmasters, and Olds Custom Cruisers it's ridiculous. Use the Dorman replacement. The OEM piece is very weak and when you start grinding and filing on it, it becomes weaker. GM doesn't replace the guide, they replace the whole regulator assembly at around $500. They really rip off their customers.
 

Top Bottom