This is how I installed a pre turbo EGT probe.
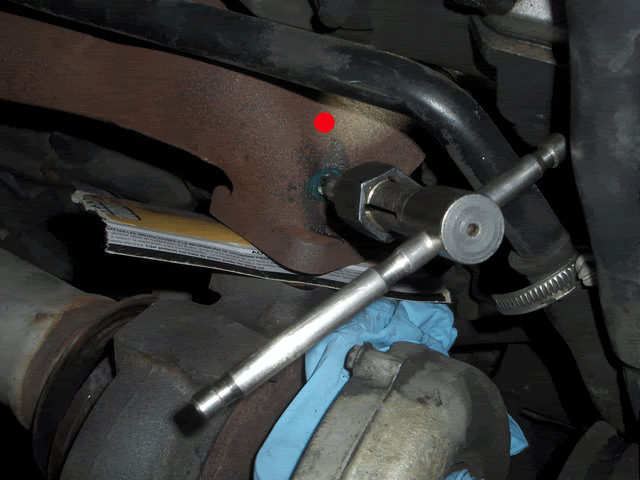
The 2 questions that usually come up are pre or post turbo, the other is whether to remove the turbo or not. I decided that the improved accuracy of a pre turbo installed pyrometer (the little doodad that sits in the exhaust stream and creates a small current based on temp.) was worth the hassle. The main reason for removing the manifold and turbo is to be sure not get any metal shavings in the turbo. I had decided to remove the turbo entirely, however could not get the 2 torx bolts off the oil return line (this was due to lack of the right length extension). This hard metal return line runs into the block through a rubber gasket allowing some flex. So on to plan b - a piece of cardboard in between the turbo and manifold like pic 1. Of course to get the turbo floating around you will need to remove the exhaust clamp, and exhaust support clamp directly down stream from the turbo, the top oil line (carefully), and loosen the lower bracket at the turbo, I had removed the air intake and outlet as I was planning on complete removal but this was not necessary (the blue rubber gloves are keeping things clean) This worked very well and I could hear and see metal dropping down onto the cardboard - proving that the grease method isn't all its cracked up to be (I have read several others saying the same). Next, carefully tap the hole, my autometer pyrometer required an 1/8 NPT tap and lucky for me my father in law is a machinist and had one. His advice was to tap till less than half way in, remove the tap and check the fit. I was tapping a couple of turns, removing the tap, checking the fitting, and repeating until the pyrometer threaded in all the way through the manifold but not into the interior cavity. Next, wire it all up! It took me about 2 hours to do (and a couple of beers to steady my nerves afterwards - seeing that hole in the manifold was weird!)
The 2 questions that usually come up are pre or post turbo, the other is whether to remove the turbo or not. I decided that the improved accuracy of a pre turbo installed pyrometer (the little doodad that sits in the exhaust stream and creates a small current based on temp.) was worth the hassle. The main reason for removing the manifold and turbo is to be sure not get any metal shavings in the turbo. I had decided to remove the turbo entirely, however could not get the 2 torx bolts off the oil return line (this was due to lack of the right length extension). This hard metal return line runs into the block through a rubber gasket allowing some flex. So on to plan b - a piece of cardboard in between the turbo and manifold like pic 1. Of course to get the turbo floating around you will need to remove the exhaust clamp, and exhaust support clamp directly down stream from the turbo, the top oil line (carefully), and loosen the lower bracket at the turbo, I had removed the air intake and outlet as I was planning on complete removal but this was not necessary (the blue rubber gloves are keeping things clean) This worked very well and I could hear and see metal dropping down onto the cardboard - proving that the grease method isn't all its cracked up to be (I have read several others saying the same). Next, carefully tap the hole, my autometer pyrometer required an 1/8 NPT tap and lucky for me my father in law is a machinist and had one. His advice was to tap till less than half way in, remove the tap and check the fit. I was tapping a couple of turns, removing the tap, checking the fitting, and repeating until the pyrometer threaded in all the way through the manifold but not into the interior cavity. Next, wire it all up! It took me about 2 hours to do (and a couple of beers to steady my nerves afterwards - seeing that hole in the manifold was weird!)
Attachments
-
66.9 KB Views: 456
-
39.9 KB Views: 443
-
78.7 KB Views: 441
-
60.1 KB Views: 445
-
74.5 KB Views: 445


