
The Sprinter forums have been a wonderful resource, with the many years of experiences folks have doing Sprinter conversions. I've learned much and have been using ideas from folks here, and sometimes outright copying things.
Here's where I've ended up, building out my ProMaster:
Finally... nine months after ordering, five months after delivery, and four months after the first mod, I have started my build thread. I hope to be reposting here what I write up over here: http://bobthevan.blogspot.com/
For larger pictures: http://bobthevan.blogspot.com/2015/02/before-beginnings-of-bob.html
Before the Beginnings of BoB
One of my 'hobbies' is to provide rider support in multiday ultracycling races. Its been my summer activity for several years now. For proper rider support in the follow vehicle the standard is to take a minivan, strip all but one seat out, and set up the rest of the space with shelves, storage, and maybe a bed. I've worked in some well-done support vehicles, and some that were a bit wanting.
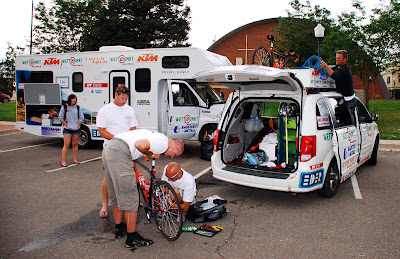
One of the more organized support vehicles
I had rambling thoughts about buying a new minivan and setting it up for such a use. I could take it out for race support, and for my general use of hauling bikes and car-camping other times. Rather figured it would never happen, but I kept thinking about it. Top of the list was the Honda Odyssey and the Toyota Sienna.
A few years ago one of my friends showed up at a 'short' ultra race with a Sprinter van, self built on the interior. I loved it. Problem was, he had a great setup for 'regular' bikes, storing them under the bed in the back; I ride recumbents, the darn things are much longer, and harder to store. I like the idea of such a van, but ruled it out for space, size, and cost considerations.
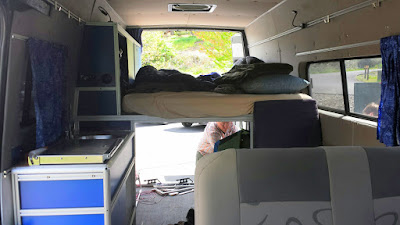
Custom Sprinter build, bike garage under the bed

Added crew seat
Around this time my girlfriend was travelling more frequently. We have two Italian Greyhounds that excel at agility competitions and conformation showing. Often she would travel and stay in a hotel, occasionally go with a friend in her older 30' Class A RV.
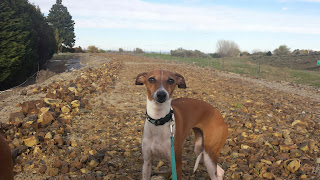
Teaghan
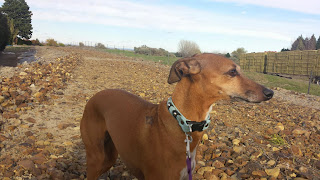
Tari
I had since revisited my friend's Sprinter build. He had picked up a used first gen T1N Sprinter and put together a clean and simple interior. This got me to the Sprinter Source forums. I started reading everything I could over there. Started getting grand ideas too. We tossed about the idea of buying a Sprinter.
Looked at some of the Class B vans out there; they were nice, nice and pricey. They also didn't fit for our uses. I wanted to be able to carry the bikes inside, she wanted to be putting the dog crates inside. And do either of them while maintaining the usability of the interior. Also, the darn things were a bit too expensive for us; $80k seemed to be the low end starting point, going well over $110k if you wanted to.
By now its around the end of 2014, we both shelved the idea of a van. I had my car to carry stuff OK, and had car-camped in it well enough. She was going to be travelling in our friend's RV more often. Not sure what exactly changed, but we made a rather quick swing in thinking yet again.
Sometime in January we started talking seriously about getting a van and doing the build. I had done some work with 80/20 aluminum framing in building a couple custom dog crates. Had fun with it, and could see the potential. I had also seen many of the 80/20 builds from the Sprinter forums, figured that was something I could manage.

Custom 80/20 framed dog crate
So it was back to 'research' for a van. The default was the Sprinter. But then I wasn't comfortable with all the complaints on the forums regarding the newer NCV3 models. Especially with the diesel emissions issues. So the research changed over to looking at the ProMaster and the upcoming Ford Transit, both available with gasoline engines. It was still early times for the ProMaster, there were plenty of issues with the first year stuff. A browse of the PM forums was a bit scary. Over at the Transit forums, it was all about when they would finally be available. Maybe. Sometime.
With the Sprinter off the list, and the Transit not out yet, we went out to look at the PM. Stopped by the local dealer and (not surprisingly) was immediately offered a test drive. So I took it. First thing I noticed was the touchy throttle, but figured I could get used to it. Also made a quick note that I didn't like the suspension seat. But overall, it was a nice van. Especially liked the width and the walls that are closer to vertical than the Sprinter. I was back a few times to look at the PM again, was liking what I was seeing.
Then for whatever reason I got some interest in the PM diesel. No, I know the reason. It was Adrian at the PM forums, posting about his long distance drives and how well the PM diesel managed the miles. Our forecast usage would be lots of weekend road trip miles, so it sounded good. But I wanted to drive the diesel first. Managed to find a diesel in stock about 30 miles away, headed down for a test drive for the both of us. I liked it, she was okay with it.
Not long after that, back to our local dealership to place an order. Yep, we ordered it. By this time I had been looking at the inventory in all of the Pacific Northwest, and beyond. I could not find a PM that had (or didn't have) the options we wanted. Slider door window, yes. Partition, no. Interior convenience group, yes. Extended mirrors, no. The search went on for awhile, and then we finally placed the order on February 21st, 2015.
Here's where I've ended up, building out my ProMaster:
Finally... nine months after ordering, five months after delivery, and four months after the first mod, I have started my build thread. I hope to be reposting here what I write up over here: http://bobthevan.blogspot.com/
For larger pictures: http://bobthevan.blogspot.com/2015/02/before-beginnings-of-bob.html
Before the Beginnings of BoB
One of my 'hobbies' is to provide rider support in multiday ultracycling races. Its been my summer activity for several years now. For proper rider support in the follow vehicle the standard is to take a minivan, strip all but one seat out, and set up the rest of the space with shelves, storage, and maybe a bed. I've worked in some well-done support vehicles, and some that were a bit wanting.
One of the more organized support vehicles
I had rambling thoughts about buying a new minivan and setting it up for such a use. I could take it out for race support, and for my general use of hauling bikes and car-camping other times. Rather figured it would never happen, but I kept thinking about it. Top of the list was the Honda Odyssey and the Toyota Sienna.
A few years ago one of my friends showed up at a 'short' ultra race with a Sprinter van, self built on the interior. I loved it. Problem was, he had a great setup for 'regular' bikes, storing them under the bed in the back; I ride recumbents, the darn things are much longer, and harder to store. I like the idea of such a van, but ruled it out for space, size, and cost considerations.
Custom Sprinter build, bike garage under the bed
Added crew seat
Around this time my girlfriend was travelling more frequently. We have two Italian Greyhounds that excel at agility competitions and conformation showing. Often she would travel and stay in a hotel, occasionally go with a friend in her older 30' Class A RV.
Teaghan
Tari
I had since revisited my friend's Sprinter build. He had picked up a used first gen T1N Sprinter and put together a clean and simple interior. This got me to the Sprinter Source forums. I started reading everything I could over there. Started getting grand ideas too. We tossed about the idea of buying a Sprinter.
Looked at some of the Class B vans out there; they were nice, nice and pricey. They also didn't fit for our uses. I wanted to be able to carry the bikes inside, she wanted to be putting the dog crates inside. And do either of them while maintaining the usability of the interior. Also, the darn things were a bit too expensive for us; $80k seemed to be the low end starting point, going well over $110k if you wanted to.
By now its around the end of 2014, we both shelved the idea of a van. I had my car to carry stuff OK, and had car-camped in it well enough. She was going to be travelling in our friend's RV more often. Not sure what exactly changed, but we made a rather quick swing in thinking yet again.
Sometime in January we started talking seriously about getting a van and doing the build. I had done some work with 80/20 aluminum framing in building a couple custom dog crates. Had fun with it, and could see the potential. I had also seen many of the 80/20 builds from the Sprinter forums, figured that was something I could manage.
Custom 80/20 framed dog crate
So it was back to 'research' for a van. The default was the Sprinter. But then I wasn't comfortable with all the complaints on the forums regarding the newer NCV3 models. Especially with the diesel emissions issues. So the research changed over to looking at the ProMaster and the upcoming Ford Transit, both available with gasoline engines. It was still early times for the ProMaster, there were plenty of issues with the first year stuff. A browse of the PM forums was a bit scary. Over at the Transit forums, it was all about when they would finally be available. Maybe. Sometime.
With the Sprinter off the list, and the Transit not out yet, we went out to look at the PM. Stopped by the local dealer and (not surprisingly) was immediately offered a test drive. So I took it. First thing I noticed was the touchy throttle, but figured I could get used to it. Also made a quick note that I didn't like the suspension seat. But overall, it was a nice van. Especially liked the width and the walls that are closer to vertical than the Sprinter. I was back a few times to look at the PM again, was liking what I was seeing.
Then for whatever reason I got some interest in the PM diesel. No, I know the reason. It was Adrian at the PM forums, posting about his long distance drives and how well the PM diesel managed the miles. Our forecast usage would be lots of weekend road trip miles, so it sounded good. But I wanted to drive the diesel first. Managed to find a diesel in stock about 30 miles away, headed down for a test drive for the both of us. I liked it, she was okay with it.
Not long after that, back to our local dealership to place an order. Yep, we ordered it. By this time I had been looking at the inventory in all of the Pacific Northwest, and beyond. I could not find a PM that had (or didn't have) the options we wanted. Slider door window, yes. Partition, no. Interior convenience group, yes. Extended mirrors, no. The search went on for awhile, and then we finally placed the order on February 21st, 2015.


")


